fbpx

A Simple Guide to Changing Your Tenda WiFi Name and Password

Avatar

Introduction: Are you looking to customize your Tenda WiFi network to improve security and make it easier to identify? Changing the network name (SSID) and password is a great way to start. In this blog post, we’ll walk you through the steps to change your Tenda WiFi router’s name and password so you can enjoy a personalized and secure internet experience.

Keywords: Tenda, WiFi, Kenya, change name, change password

Step 1: Login to your router (Guide: How to Log in to Your Tenda WiFi Router: A Step-by-Step Guide

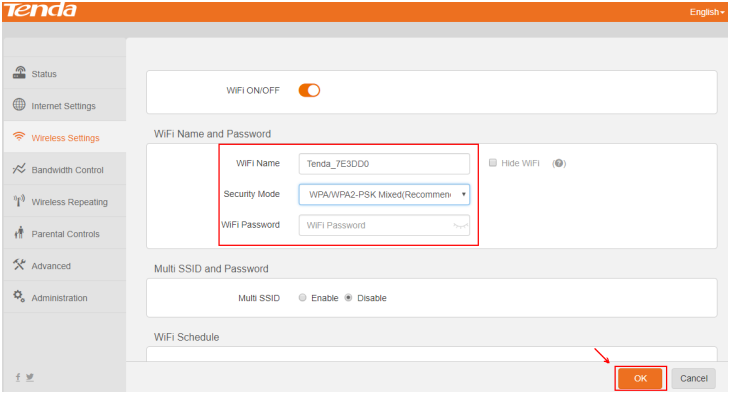
Step 2: Navigate to the Wireless Settings After successfully logging in, look for the “Wireless” or “WiFi” section in the router’s settings menu. This section may be named differently depending on your Tenda router model. However, it is typically found under “Wireless” or “Wireless Settings” in the main menu.

Step 3: Change the WiFi Network Name (SSID) In the Wireless Settings section, locate the field labeled “SSID” or “Network Name”. Enter the new name you’d like for your WiFi network in this field. The new name should be unique and easy to identify but avoid including personal information.

Step 4: Change the WiFi Password Still in the Wireless Settings section, locate the “Password”, “Pre-shared Key”, or “Security Key” field. Enter your desired new password in this field. Make sure to use a strong and unique password, ideally a mix of letters, numbers, and special characters, to enhance your network’s security.

Step 5: Save Your Changes After updating the WiFi network name and password, click the “Save”, “Apply”, or “Submit” button to save your changes. The router may take a few moments to update and apply the new settings.

Step 6: Reconnect Your Devices Once the changes have been saved, your devices will be disconnected from the WiFi network. You’ll need to reconnect them using the new network name (SSID) and password you’ve just set.

Conclusion: Changing your Tenda WiFi router’s name and password is a straightforward process that can significantly improve the security and user experience of your network. Follow the steps outlined in this guide to personalize your Tenda WiFi network and enjoy a customized and secure internet connection.

How to Log in to Your Tenda WiFi Router: A Step-by-Step Guide

Avatar

Introduction: As the demand for reliable internet connections in Kenya continues to grow, many people are opting for Tenda WiFi routers to satisfy their needs. Tenda offers affordable, high-performance devices that have become popular among Kenyan households and businesses. In this blog post, we will walk you through the process of logging in to your Tenda WiFi router to help you manage your internet connectivity and get the most out of your device.

Keywords: Tenda, WiFi, Kenya, internet

Step 1: Connect to Your Tenda WiFi Network Before logging in to your Tenda router, ensure that your device (laptop, smartphone, or tablet) is connected to the router’s WiFi network. Look for the network name (SSID) printed on the back of the router or in the user manual, and enter the default password to connect.

Step 2: Open a Web Browser Open a web browser (such as Google Chrome, Mozilla Firefox, or Microsoft Edge) on your connected device. It’s important to use a device with a stable wifi connection to avoid any disruptions during the login process.

Step 3: Enter the Router’s IP Address In the address bar of your web browser, type the router’s default IP address and press Enter. For most Tenda routers, the default IP address is 192.168.0.1. Alternatively, you can also try 192.168.1.1 if the first IP address does not work.

Step 4: Log in to the Tenda Router Once you have entered the IP address, you will be prompted to enter a username and password to access the router’s settings. For most Tenda routers, the default username and password are both “admin”. If this does not work then you should contact your ISP to get the credentials for login. Many internet providers in Kenya including iNet Africa protect the router from unauthorised access by setting a secure password. Enter these credentials and click “Log in” or “Sign in” to proceed.

Step 5: Access the Router’s Settings After successfully logging in, you will have access to your Tenda router’s settings and configuration page. Here, you can change the WiFi network name (SSID), password, security settings, and more. Take some time to familiarize yourself with the various options and features available to optimize your internet experience.

Conclusion: Logging in to your Tenda WiFi router is a simple process that allows you to manage and configure your internet connection. By following the steps outlined in this guide, you can quickly access your router’s settings and enjoy a seamless online experience. As Tenda continues to provide affordable and high-quality internet solutions for Kenyans, make sure to stay up-to-date with the latest technology and best practices to make the most of your WiFi network.